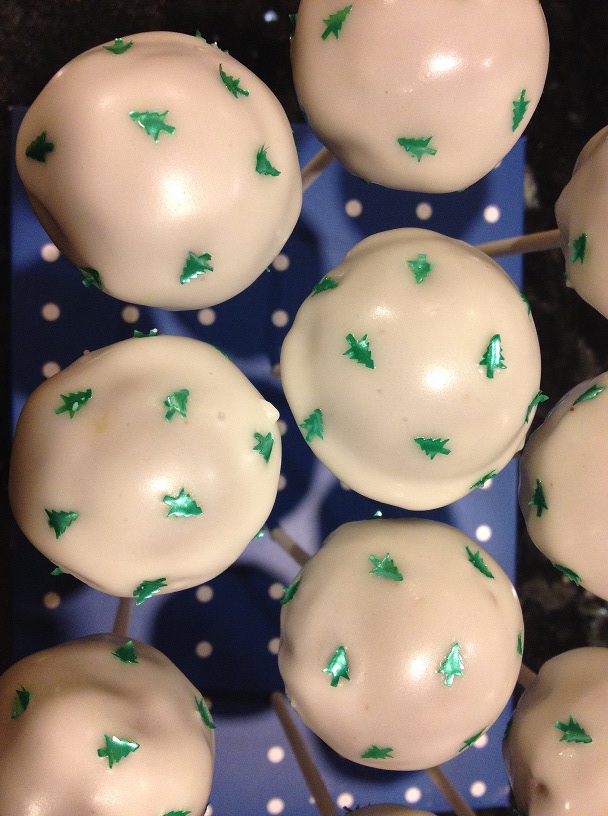
Christmas Themed Orange Chocolate Cake Pops

I was lucky enough to receive a free cake pop machine with one of my many Christmas shopping orders. I’ve always thought cake pops look so fun to make, so I’m chuffed I now have my own to experiment with!

One frosty afternoon between Christmas and New Year I decided it was time to try out cake pops for the first time. It was a bit nerve racking at first not really knowing what I was doing, but I soon got the hang of it, and they look pretty good for a first attempt – if I do say so myself!

The following recipe is my adaptation from a Lakeland’s cake pop recipe…

Ingredients:

  • 125g softened butter
  • 125g caster sugar
  • 2 medium eggs
  • 2 tsp vanilla essence
  • Grated zest of 1 un-waxed orange
  • Juice of 1 orange
  • 100g self-raising flour
  • 25g cocoa powder
  • Icing sugar
  • Christmas tree edible glitter

Cake Pop Accessories:

  • Stand
  • Sticks
  • Plastic covers
  • Ribbons/ties

Method:

In a large mixing bowl, beat together the butter and sugar until soft and light. Add one egg at a time beating thoroughly in between until totally mixed together. After this add the vanilla essence and orange zest, beat until combined. Lastly, sift the flour and cocoa powder into the bowl and mix until fully incorporated.

Now is the fun bit! Plug your cake pop machine in and switch on to heat up, once the green light appears indicated the machine is up to temperature you are ready to do your first batch! Try to fill the semi-circles as quickly as possible (without making too much mess!) so that the machine doesn’t cool down too much, then close the lid and bake!

Bake for 4-5 minutes, I would do for 4 minutes if the semi-circles are not totally filled, and 5 minutes if filled to the brim.

Once baked, open the lid and switch off. After a minute or two, carefully scope the balls of cake out of the machine and place onto a plate to cool down.

photo 1 (3)

Repeat this process until you have no mixture left and lots of lovely balls of cake!

Insert each ball of cake onto a stick and place in the cake pop stand to cool fully.

photo 2 (1)


Once cool you can make your orange icing. I haven’t put any measurements for the icing or orange juice as I feel icing is very temperamental – so I find it’s best to add icing and orange juice bit by bit until you have a good amount, at a very thick consistency.

Paste the icing onto each cake pop, and decorate with Christmas tree edible glitter, then pop back into the cake stand for the icing to set.

photo 2

(To preserve the cake pops wrap in plastic covers and tie at the bottom with ribbon.)

cake pop

//

Raspberry Crumble Cake

The recent nice weather has made our fruit go mad, especially the raspberrys!

So I experimented (borrowing tips and tricks) to make this luscious raspberry crumble cake! This is a great recipe that I discovered stays moist for nearly 2 weeks when kept in an airtight container – if you can manage to make it last that long! πŸ˜› It’s lovely warm as a pudding with custard, and equally delicious when cold with cream and additional fresh berries.

Ingredients:

Cake:

  • 140g butter
  • 250g caster sugar
  • 2 eggs
  • 1tsp vanilla extract
  • 175ml plain yoghurt (I used Greek)
  • 3tsp baking powder
  • 1/2tsp bicarbonate of soda
  • 250g plain flour
  • 225g fresh or frozen raspberries (I used fresh from the garden, yum! :))

Crumble topping:

  • 100g plain flour
  • 50g butter
  • 50g light brown soft sugar
  • Pinch of salt

Method:

Preheat your oven to 180 degrees celsius (or 160 degrees celsius if a fan oven), grease the sides of a 25cm spring form / loose bottomed cake tin, lining the base with a circle of greaseproof paper.

Now onto making the cake mixture, beat the sugar and butter together until pale and fluffy, add the eggs and vanilla and beat well again. After this, beat in the yoghurt, finally sifting the flour, bicarbonate of soda and baking powder in last, stirring gently until all combined.

The mixture should be quite a thick consistency once all the cake ingredients are combined. Scoop the mixture into your prepared cake tin, spreading out with a spatula to make sure it reaches all sides and is as evenly spread as possible. Then spread the raspberries evenly across the top of the cake mixture.

Leave this to the side, either with some cling fling on or something else covering it, then you can make your crumble topping. Like with any crumble mixture, start off by rubbing the butter and flour together to make a fine breadcrumb texture, then mix in the sugar and salt. Sprinkle this evenly on top of your raspberry cake mixture.

Put in the oven and bake for 50-60 minutes until golden, and when a knife is inserted into the middle it comes out clean. Once out of the oven, remember to leave to cool for at least 15 minutes, then you can take the cake out of the tin and allow to cool on a cooling rack. Then all that is left to do is cut out a slice and enjoy! πŸ™‚

Remember to store in an airtight container to keep it nice and moist for up to two weeks. I think this recipe is great as the fruit never sinks either! Lastly, you can use any other type of berries here instead of raspberries and it will work just as well – I’m using blueberries next! πŸ˜€

raspberry crumble cake

//