Moussaka

Aubergines have started multiplying by the minute in my parent’s vegetable garden, so I chose the biggest one (which was so big it took two hands to carry!) and happily went off to make some moussaka 🙂

For inspiration, I mainly followed this recipe I found from The Guardian, however as per usual I added a few of my own tweaks along the way! Below is my twist on this recipe, but click here to see the original.

Ingredients (serves 6):

  • 1 very large (or two smaller) aubergine, sliced

 For the mince:

  • 4 tbsp olive oil
  • 2 large white onions, finely chopped
  • 5 tsp cinnamon
  • 1 tsp dried oregano
  • 500g minced beef
  • 1 x 400g can of chopped tomatoes
  • 150ml red wine
  • Salt and pepper

For the white sauce:

  • 500ml milk
  • 60g butter
  • 60g plain flour
  • 50g strong cheddar cheese, grated
  • 2 eggs, beaten
  • 5 tsp cinnamon
  • Salt and pepper
  • 1 x ball of mozzarella

Method:

Heat your oven to 180 degrees celsius and then it’s time to tackle the aubergine! Cut into slices (make these as thin as possible!), for ease I cut circle and semi-circle slices instead of length way strips. One cut leave to the side.

Moussaka

Put the olive oil into a large saucepan to heat; add the onion and cook for a few minutes until softened then stir in the cinnamon and oregano. Now add the mince and keep cooking and stirring until brown on all sides. Now you can add the tomato and red wine. Mix it all together, season and leave to simmer.

Whilst this is simmering you can make the white sauce. Measure the milk into a microwavable jug, and heat for 2 minutes. Whilst this is heating start to gently melt the butter in a saucepan. Once melted, stir in the flour until combined, and then start to slowly pour in the milk bit by bit, whisking constantly until the mixture becomes nice and thick.

Once it has reached a thickness you are satisfied with and all lumps have disappeared, stir in the cheese until melted. Take off the heat and allow to cool slightly before whisking in the (already beaten) eggs and cinnamon.

Moussaka.3

Now for the assembling! Place a layer of the aubergine slices in a large oven proof dish, then a mince layer, followed by a white sauce layer. Repeat this process until all the mixture is used up, making sure you end with a layer of white sauce. Finally, slice up the mozzarella ball and dot these pieces across the top, with a final sprinkling of salt and pepper on top.

Moussaka.4

Bake in the oven for about 45 minutes until brown and bubbling. Serve with some fresh green vegetables. Enjoy! 😀

Moussaka.5Moussaka.6

Moroccan Chicken One Pot

With hungry people to feed and an abundance of vegetables in my parent’s garden, I devised this simple yet delicious recipe one sunny weekend a couple of weeks ago. This is a really easy Moroccan themed one pot dish that’s healthy as well as tasty 🙂

Ingredients (serves 4):

  • 8 skin on chicken thighs
  • 1 x 400g can of chickpeas
  • 1 large aubergine
  • 6-8 large tomatoes (any type will do, I used a mixture from the garden)
  • Ground cumin
  • Ground coriander
  • Ground cinnamon
  • Salt & pepper
  • Olive oil

Method:

  • Set your oven to 180 degrees celsius
  • Simply chop up the aubergine into bite size pieces and cut the large tomatoes into eighths
  • Place these in a large and deep oven proof dish
  • Drain the chickpeas and add these to the dish too
  • Add to the dish 1 tsp of the ground cinnamon, 2 tsp ground coriander, 2 tsp ground cumin, a good grind of salt and pepper and a good glug of olive oil and mix together thoroughly
  • Place the chicken thighs skin side up on to top of the mixture in the dish
  • Sprinkle some ground cumin and coriander on top of each of the thigh skins, along with some salt and pepper, and rub in
  • Place in the oven for about 50 minutes until the vegetable mixture is juicy and the chicken skins are nicely browned (I would mix the veg half way through also)

Sit down and enjoy! I had a generous helping of runner beans with mine; however some crusty bread would also go well for mopping up the juices! YUM! 😀

Moroccan Chicken

Cauliflower Cheese Bake

It’s cauliflower mayhem at my parents’ house at the moment, with about 10 being ready in one day! I know the poor old cauliflower tends to be cast down the list of tasty veg, however last summer my Mum invented a fab cauliflower bake that made me see the humble cauliflower in a brand new light! Now that I am an “independent adult” living in my own place I thought I’d try my own cauliflower bake for myself and my flatmate one evening which we both really enjoyed, I hope you enjoy it too 🙂

Ingredients: (serves 2 hungry people)

  • One large cauliflower, cut into florets
  • 2 large potatoes suitable for mashing (I use half normal and half sweet potatoes for a little extra sweetness, but it still tastes delicious with just white potatoes)
  • 1 packet of pancetta cubes (about 200-250g works wells)
  • 1 white onion
  • 1-2 large tomatoes (I only had cherry tomatoes so had to improvise!)
  • Salt & pepper
  • A handful (or two, or three…) of grated cheddar cheese

Cheese sauce:

(You can always increase the quantities of the below to make it saucier if you fancy!)

  • 500ml milk
  • 4 tbsp flour
  • 50g butter
  • 100g strong cheddar, grated (I used cathedral city mmm)
  • 1tsp mustard (I used wholegrain)
  • 1tsp mixed spices or cinnamon
  • Salt & pepper

Method:

Cut the cauliflower into sizeable florets and boil (in a little salt) until slightly undercooked, drain and put into a medium sized dish Cauli 1Cauli 4 In the meantime you can do the food prep of chopping up the onion, peeling the potatoes and chopping them into quarters. Cauli 2 Once this is done, put the potatoes on to boil (they should take 10-15 minutes on a medium heat). Whilst they are cooking the first thing to do is fry the onion and pancetta in a little oil until lightly brown, then leave to one side for later. Cauli 3 Now it’s cheese sauce time! But don’t forget to keep checking those potatoes! Once the potatoes are done you simply drain them, mash with a bit of butter and olive oil and leave with the lid on until later.

For the cheese sauce you firstly need to melt the butter in a saucepan, and then add the flour, whisking like a mad person whilst adding the milk bit by bit. Even if your arm feels like it’s going to fall off you need to keep whisking until the sauce starts to thicken and become smooth. Once it is at a consistency you are happy with, take it off the heat and add the cheese, mustard, spices, and a grind of salt and pepper, continuing to whisk until all combined. Cauli 5 After this, mix in the pancetta and onion, and then pour the sauce over the cauliflower in your oven dish, making sure the mixture is evenly spread. Cauli 6Cauli 7 Now you can spoon the mashed potato on top of the cauliflower cheese mixture, flattening with a fork to help make sure all little holes are covered. Cauli 9 Lay slices of tomato on top (big tomatoes work better if you have them – as you can see I did not!) Cauli 10 Then scatter another generous grating of cheese on top (along with a grind of salt and pepper) and you are ready to go! Cauli 11 Cook on the top shelf of your oven at 200 degrees celsius for 15-20 minutes until brown on top. Tuck in and enjoy! Cauli end result

Pasta Free Butternut Squash and Beef Lasagne

Having some lean beef mince and a butternut squash to be used, I decided to create this pasta-free lasagne recipe. It’s also my WordPress anniversary today, hurray! So I gift you all this lovely creation as a celebration 🙂

Packed full of flavour, this lasagne is layered with slices of butternut squash between a mince sauce packed with sage, a deliciously cheesy and creamy white sauce speckled with nutmeg, and a sprinkling of pine nuts to finish.

This started off as a bit of a “let’s hope this works!” but turned out amazingly! I hope you enjoy it…

Ingredients (serves 4-5)

  • 1 medium to large butternut squash
  • Pine nuts (two handfuls)

Mince sauce:

  • 1 x 400g pack of lean beef mince
  • 1 x tin of chopped tomatoes
  • 2 x red onions
  • 2-4 cloves of garlic (depending on how big your cloves are and how garlicky you like it!)
  • 2 x tablespoons of tomato puree
  • 1 x glass of red wine
  • 2-3 tps of dried sage, or a small bunch of chopped fresh sage
  • Salt and pepper

White sauce:

  • 85g butter
  • 85g plain flour
  • 750ml semi-skimmed milk
  • Grated cheddar cheese, a couple of big handfuls
  • 1 heaped tsp grated nutmeg

Method:

The first big job to do is tackle the peeling of the butternut squash! I find it easiest to cut in half first before peeling or simply cutting off the skins with a sharp knife. Once all the skin is removed, cut into thin slices.

Pasta Free Lasagne

After this it’s time to make the mince sauce. Brown off the mince in a large saucepan and then add the chopped garlic and onions to give them a bit of colour, and then add the red wine, tomatoes, tomato puree and let it simmer away and reduce for about 10-15 minutes. Add the seasoning and the sage to taste, simmer for a few more minutes before taking off the heat and setting to one side.

Pasta Free Lasagne.2

Now you can make your lovely cheesy white sauce infused with nutmeg! Gently melt the butter in a pan and once melted whisk in the flour, then once combined, slowly pour in the milk whilst constantly whisking to get rid of any lumps. Keep whisking until you feel it thicken to a good consistency, then add the cheese and nutmeg and whisk until fully combined. Take off the heat.

It’s now my favourite (and definitely the most fun!) part, it’s layering time!

Pasta Free Lasagne (two pics)


Get a nice big dish, I opted for a nice heart shaped one, and start your layers! Firstly a layer of the mince sauce, followed by the butternut squash and topped with the cheesy white sauce. Repeat until you run out, ending with a white sauce layer. Top this final layer with some more grated cheese and the pine nuts for a lovely finish!

Pasta Free Lasagne.5


Bake in a preheated oven at 180 degrees celsius for 40-50 minutes until bubbling and browned on top, then dig in! 😀

Pasta Free Lasagne.6

Butternut Squash, Chorizo and Asparagus Risotto

As I’m sure you can tell from my recipe archive, pasta is one of my all-time favourite dishes. I love all types of pasta in all shapes and sizes, but for me risotto is queen of them all!

What I love about risotto is that once you have mastered a basic recipe, this can then become your base to get creative – trying all kinds of different flavour combinations and ideas.

My usual risotto recipe is a spicy red pepper, chilli, tomato and pancetta, but I fancied trying something different. Hence this recipe was born! Even though this was the first time I’ve tried this particular combo, it worked a treat and was very successful with my flatmate!

Hope you enjoy it too 🙂

Ingredients (serves 4):

  • olive oil
  • salt & pepper
  • 175-200g arborio rice
  • 2 white onions finely chopped
  • 3 large garlic cloves finely chopped
  • 1 large glass white wine
  • 1 litre vegetable stock
  • 200-250g cubed chorizo
  • 1 small or ½ large butternut squash, peeled and cubed
  • 2 bunches asparagus, cut into 1 inch long pieces, removing the woody ends
  • 50g butter
  • 50g grated parmesan cheese

Method:

Peel and cube your butternut squash and place on a large roasting tray with a covering of olive oil, salt and pepper. Place in a fan oven at 180 degrees celsius for 30 minutes until cooked and tender.

photo 1 (1)

Whilst the butternut squash is cooking you can start the risotto!

Put a large non-stick saucepan or frying pan on the heat to warm up whilst you finely chop your onions and garlic. Add a glug of olive oil to the pan and brown the onions, garlic and cubed chorizo for a couple of minutes.

Once nicely browned, add the risotto rice and stir constantly for another couple of minutes until the rice becomes translucent. Add the wine and stir until it’s nearly all absorbed.

At this point you need to make sure the heat is set so it’s simmering moderately (but not to vigorously!). Have your litre of vegetable stock at the ready and add one ladle at a time, stirring constantly until the majority of the liquid is absorbed before adding the next ladle. N.B. The consistency once absorbed should be thick and sticky.

This process will take around 20-30 minutes and can be quite tough on the arm – but don’t give up, the end result is worth it!

(Test the rice after about 20 minutes to see if cooked through and soft – if it is not soft when you have used up all the stock then make up some more to add.)

Once the butternut squash is ready, add this to the risotto mixture along with the asparagus, and cook for another 5 or so minutes until the asparagus is tender.

Risotto (2)

Once you are certain all the excess liquid is absorbed and everything is fully cooked through, take the risotto off the heat and stir through the parmesan and butter, along with a generous grinding of salt and pepper. Stir thoroughly until the butter and cheese is totally melted and incorporated into the risotto.

Risotto 3

Serve in nice big pasta dishes and enjoy with a nice glass of vino! 😀 Yumbola!

Bon Appetit!

Bon Appetit!

//

Spring Chicken One Pot

Seeing as we are seeing glimmers of Spring in the air I thought I would post a recipe I tried out at the weekend from the trusty BBC Good Food website. My parents were returning from a month in Australia (alright for some!) so I made a heap of this Saturday evening so there was plenty left over for them to munch whenever they felt hungry with their messed up body clocks!

It’s an easy to make and healthy dish that I would recommend as something that is comforting whilst being good for you, enjoy!

Ingredients (serves 6):

  • Salt and pepper
  • 2 tbsp olive oil
  • 3 medium white onions, chopped
  • 750g bonesless, skinless chicken thighs
  • 500g small new potatoes (cut any big ones in half)
  • 1 litre vegetable stock (using a fair bit more than the recipe here as it boils down quite a lot, and I like it juicy!)
  • 1 large broccoli head, cut into small florets
  • 550g spring greens, shredded
  • 300g petit pois
  • Large bunch of spring onions, sliced lengthways
  • 6-8 tsp green pesto (depends on how pesto-y you like it!)
Lots of healthy greens!

Lots of healthy greens!

Method:

Add the olive oil to a large saucepan and heat until hot, then add the onion and fry for 5 minutes until softened, add the chicken and fry for another few minutes until lightly coloured on all sides.

After this, add the potatoes, stock and lots of freshly ground black pepper and salt. Bring to the boil and then put the lid on the saucepan and simmer for 30 minutes, until the potatoes are tender when a fork is inserted and the chicken is cooked through and breaks apart easily.

Spring Chicken One Pot

 (If you wish you can freeze off portions at this point).

Add the broccoli, spring greens, petit pois and spring onions, stir well and then return to the boil. Cover and cook for 5 minutes until the broccoli and spring green stalks are tender. Stir in the pesto and leave to bubble for another minute or so, then remove from the heat, serve and enjoy!

Spring Chicken One Pot.3

//

Christmas Themed Orange Chocolate Cake Pops

I was lucky enough to receive a free cake pop machine with one of my many Christmas shopping orders. I’ve always thought cake pops look so fun to make, so I’m chuffed I now have my own to experiment with!

One frosty afternoon between Christmas and New Year I decided it was time to try out cake pops for the first time. It was a bit nerve racking at first not really knowing what I was doing, but I soon got the hang of it, and they look pretty good for a first attempt – if I do say so myself!

The following recipe is my adaptation from a Lakeland’s cake pop recipe…

Ingredients:

  • 125g softened butter
  • 125g caster sugar
  • 2 medium eggs
  • 2 tsp vanilla essence
  • Grated zest of 1 un-waxed orange
  • Juice of 1 orange
  • 100g self-raising flour
  • 25g cocoa powder
  • Icing sugar
  • Christmas tree edible glitter

Cake Pop Accessories:

  • Stand
  • Sticks
  • Plastic covers
  • Ribbons/ties

Method:

In a large mixing bowl, beat together the butter and sugar until soft and light. Add one egg at a time beating thoroughly in between until totally mixed together. After this add the vanilla essence and orange zest, beat until combined. Lastly, sift the flour and cocoa powder into the bowl and mix until fully incorporated.

Now is the fun bit! Plug your cake pop machine in and switch on to heat up, once the green light appears indicated the machine is up to temperature you are ready to do your first batch! Try to fill the semi-circles as quickly as possible (without making too much mess!) so that the machine doesn’t cool down too much, then close the lid and bake!

Bake for 4-5 minutes, I would do for 4 minutes if the semi-circles are not totally filled, and 5 minutes if filled to the brim.

Once baked, open the lid and switch off. After a minute or two, carefully scope the balls of cake out of the machine and place onto a plate to cool down.

photo 1 (3)

Repeat this process until you have no mixture left and lots of lovely balls of cake!

Insert each ball of cake onto a stick and place in the cake pop stand to cool fully.

photo 2 (1)


Once cool you can make your orange icing. I haven’t put any measurements for the icing or orange juice as I feel icing is very temperamental – so I find it’s best to add icing and orange juice bit by bit until you have a good amount, at a very thick consistency.

Paste the icing onto each cake pop, and decorate with Christmas tree edible glitter, then pop back into the cake stand for the icing to set.

photo 2

(To preserve the cake pops wrap in plastic covers and tie at the bottom with ribbon.)

cake pop

//

Pesto Chicken Stew with Cheesy Dumplings

This is one of my favourite recipes from BBC Good Food which I have made multiple times, and it never fails to warm you up on a cold day – it’s the ultimate Autumnal comfort food.

What’s also great is that you make it all in one big pot and any leftovers can be frozen for another night (I have been known to cook this recipe for 8 people for just myself and freeze the rest!)

Due to the fact I have made this recipe various times, I have tried different additions along the way, the most successful of which I will include below! I hope you enjoy it 🙂

Ingredients (serves 8):

Dumplings:

  • 140g butter
  • 250g self-raising flour
  • 100g parmesan, grated
  • 50g pine nuts
  • 150ml cold water
  • 1 handful fresh basil leaves, finely chopped (my addition)

Stew:

  • 2 tbsp olive oil
  • 12-15 chicken thighs (with bone but no skin)
  • 200g smoked bacon lardons (I also like to use pancetta cubes as an alternative)
  • 1 large white onion, chopped
  • 4 celery sticks, chopped
  • 3 leeks, chopped
  • 4 tbsp plain flour
  • 200ml white wine (I find a light wine such as a sauvignon blanc works best)
  • 1 litre good quality chicken stock
  • 2 bay leaves
  • 200g frozen peas
  • 140g sundried tomatoes
  • 140g fresh pesto (green pesto)
  • Small bunch of basil, chopped

Method:

I like to start by making the dumplings first, as then they can chill in the fridge until needed. Place the flour in a large bowl, and chop the butter into small cubes and add to the flour. Then as if you were making a crumble topping, rub the flour and butter between your fingertips to resemble fine breadcrumbs.

Mix in the grated cheese and chopped basil and approximately 150ml of cold water, adding bit by bit whilst you mix with a cutlery knife until it all comes together to form a light dough, which is slightly sticky to the touch. Break off walnut sized pieces and roll into small balls and (after placing the pine nuts on a plate) roll in the pine nuts so they stick to the outside. Put all the dumplings on a cling filmed plate in the fridge.

Next, it’s time for the stew! Heat the oil in a large casserole dish and brown the chicken so all sides are golden. Due to the amount of the chicken I would advise doing this in a couple of batches, and setting aside in a separate bowl once browned. Once all the chicken is browned, leave to the side.

Next, add the bacon lardons (or pancetta cubes) to the casserole dish to crisp up, then add the onion, celery and leeks. Cook for about 10 minutes until the vegetables have softened. Stir in the flour and season with salt and pepper, cooking for another couple of minutes.

Stir in the wine and allow to reduce slightly, then stir in the stock. Return the chicken thighs to the pan along with the bay leaves; cover the casserole dish with a lid. Reduce the heat so that the stew is gently simmering, and then leave to simmer for about 1.5 hours, or until the chicken is tender.

(Remove the dumplings from the fridge during the last 30 minutes of the stew’s cooking time, to allow them to come back up to room temperature.)

Heat the oven to 200 / 180 degrees celsius if fan oven. Add the peas, sundried tomatoes, pesto and basil to the stew, stirring everything in. Place the dumplings on top of the stew and scatter a few more pine nuts on top if you wish. Place the dish in the oven and cook for about 25 minutes until the dumplings are golden and cooked through.

pesto chick stew

I like to serve this dish with home made crusty bread to mop up the lovely juices!

As mentioned above, any leftovers can be portioned off and frozen for another day. Enjoy! 😀

//

Spicy Butternut Squash Soup

On a nice sunny autumnal Sunday I decided to use the remaining butternut squash up in a soup – I find this soup a great winter warmer and I can’t get enough of it! I hope you enjoy it as much as I do 🙂

N.B. – I find with soup a lot of it is down to preference – many soups can be made thin, think, chunky or smooth whilst all using the same ingredients, so please feel free to adapt my below recipe to suit your needs if you prefer it a different way !

Soup Ingredients (makes 10 portions)

  • 2 medium and 1 small butternut squash
  • 4 pints of chicken stock (two cubes)
  • 3 large onions
  • 5 cloves of garlic
  • 3 ounces of butter
  • 2.5 tsp cumin seeds (or powder)
  • 5 tsp red chilli flakes
  • Salt and pepper

Toppings (for 1 portion)

  • 3-5 slices of pancetta (depending on how much you like it!)
  • A fine shaving of parmesan
  • A swirl of smoked rapeseed oil
  • Additional salt and pepper

Method:

Firstly, you either need a very sharp large knife, a strong man, or both! 😛 Slice your butternut squash length ways into quarters, place on a couple of large baking trays and brush with olive oil. After this, scatter across a generous helping of salt and pepper along with the chilli flakes and cumin seeds.

N.B. – I used dried red chilli from my garden for this recipe, which tend to vary in hotness, but are pretty powerful none the less! However you can buy chilli flakes by the jar, which are generally a medium hotness – sometimes it will say on the jar how hot they are also – so keep your eyes peeled if you are not good with too much spice!

Once your butternut squash are prepared with the spices, place the trays in the oven (180-200 degrees celsius) for about 40 minutes. (If your butternut squash quarters are quite thick they may take slightly longer to cook.)

Whilst your butternut squash is nicely roasting, prepare your garlic and onion, by finely slicing. When your butternut squash is tender when inserting a fork it is ready, take out and leave to cool for a few minutes. Once cool, use a spoon to scoop out the flesh from the skins, and put it to the side in a large bowl and mash into small chunks using a wooden spoon ready for the next stage.

Butternut squash soup.5

Place the butter in a large saucepan and heat until melted, then cook the onions and garlic in the butter until soft. Next, add 4 litres (or less if you like a thicker soup – but remember this will mean it won’t feed as many people!) of good quality chicken stock. I find the Knorr Chicken Stock Pot Gel nicely intense and flavoursome.

Butternut squash soup.1

Heat until simmering, and then add the butternut squash. Let it heat up gradually until simmering again, and simmer for 5 minutes. Take your soup mixture off the heat and spoon into a food blender – you may need to do this in two stages! Blend until smooth, and put your finished soup altogether into a large casserole sized dish, giving a final mix and taste – adding more salt and pepper if needed.

Butternut squash soup.3

When you are ready for your own bowl of soup, reheat an individual portion either in a saucepan on the hob, or in the microwave for about 3-6 minutes. Whilst your soup is heating, grill or fry your pancetta until crisp, then fold in kitchen paper to get rid of any extra grease.

When your soup is ready, grate a small amount of parmesan over the top, grind over a little more salt and pepper, add a swirl of smoked rapeseed oil and place or crumble your pancetta on top – and voila!

Enjoy by the fire with a nice glass of wine 😀

Butternut squash soup.4

//

Homemade Sweet Potato and Butternut Squash Gnocchi

I say this about a lot of things, but I do really love gnocchi and have always wanted to try making it. So when I saw a mouth-watering recipe for sweet potato gnocchi on Pinterest I had to try it, so thanks go to this lovely lady: http://www.aidamollenkamp.com

As my garden is becoming overgrown with butternut squash, I decided to experiment further and add this into the recipe also, very daring on my first gnocchi attempt I know, but I was feeling brave! Plus Will was over for dinner that evening and I thought he’d make a good test dummy 🙂 I also added some pancetta and walnuts to the already delicious sauce, for some extra crunch. This idea I owe to one of my favourite local restaurants that has the best gnocchi I’ve ever tasted, called The Wellington Arms

Ingredients:

For the gnocchi:

  • 260g sweet potatoes, halved lengthwise
  • 130g butternut squash, halved lengthwise
  • 1 tablespoon olive oil
  • Kosher Salt and Freshly Ground Black Pepper
  • 30g finely grated parmesan cheese
  • 1 egg, lightly beaten
  • 3 tablespoons honey
  • 2 teaspoons kosher salt
  • 200-300g all-purpose/plain flour

For the sauce:

  • 1 handful of walnuts, halved
  • 6 slices of pancetta
  • 4 tablespoons unsalted butter
  • 12 to 15 fresh sage leaves
  • 2 shallots, quartered and thinly sliced
  • 3 tablespoons balsamic vinegar
  • Freshly shaved parmesan, for garnish
  • Freshly ground black pepper, for garnish

Method:

Gnocchi:

First of all, weigh out the right amount of butternut squash and sweet potato. It’s very hard to get exact measurements, so I would tend to go over as you’ll be taking the filling out of the skins once cooked anyway. The exact measurements don’t matter too much as long as you roughly have a 2:1 ratio of sweet potato to butternut squash, however I have put in the above measurements as a guideline.

Cut your sweet potato and butternut squash lengthways and place on a baking tray. Rub with a little olive oil and sprinkle with salt and pepper. Bake in an oven at 200°C for about 30 minutes. N.B. Depending on how big the butternut squash is this can take longer to cook, so I advise putting the butternut squash in about 10 minutes before the sweet potato to allow for the extra cooking it may need. Check half way through. Take out when you can easily insert a fork into the flesh, leave until cool enough to handle.

Whilst cooling, fry the walnuts and pancetta in a little olive oil until crisp, then put in a bowl, cover and set aside.

Once cool, scoop out the sweet potato and butternut squash flesh and put into a large mixing bowl.  Mash well with a potato masher until smooth, and then add the parmesan, egg, honey and salt. Give a final mash and then beat with a wooden spoon. Mix in the flour bit by bit, mixing along the way until it all comes together and forms a soft dough. It may seem like you’re adding a lot of flour, and depending on how old the sweet potato and butternut squash are, you may need to add even more flour, but don’t give up hope! As long as you remember to keep adding the flour and mixing in little bit at a time, you will eventually get there. The texture should be damp to the touch, but not so that it is sticky and gets stuck to your hand.

N.B. At this point you can section off half to freeze and it will keep in the freezer for a good few weeks. Or alternatively, if you are preparing ahead it’s at this stage you can cling film the dough and place in the fridge until half an hour before you wish to continue with the recipe.

Turn the dough onto a floured surface and shape into a square (I used a rolling pin here, but make sure you put enough flour underneath so it doesn’t get stuck to the surface). I didn’t attempt to make any proper or fancy shapes, I simply used a sharp knife to cut rectangular shapes out of the dough, shaping as I went along, so I ended up with shapes like this:

Gnocchi.3

Be aware that the dough goes a lot further than you think, so I’d advice to make enough shapes as you think will feed you and however many people you are cooking for, then freeze the rest.

Now it’s time to cook your gnocchi and get your sauce on the go!

Bring a saucepan of water to the boil, adding a generous sprinkling of salt to the pan. When boiling, add the gnocchi and boil for about 5 minutes until tender. You can tell when the gnocchi is ready, as it tends to puff out and rise to the surface. Once ready, take off the heat and using a slotted spoon, carefully place the gnocchi (trying not to carry water over) onto some greaseproof paper on your work surface. (N.B. Reserve ½ cup of the pasta water)

Sauce:

Meanwhile, in a large frying pan melt the butter until foaming, add the sage leaves unti going crisp and then remove and set aside. Add the shallots and keep stirring the sauce until browning and letting off a nutty aroma. When the butter is brown and shallots cooked, remove from the heat and stir in the balsamic vinegar, add the gnocchi, the walnuts and pancetta along with the ½ cup of pasta water you reserved from earlier – then put back on the heat.

Gnocchi.2

Simmer until the sauce has thickened and the gnocchi has a nice glazed finish. Plate up, add lots of freshly ground pepper, and top off with some more parmesan and the crisp sage.
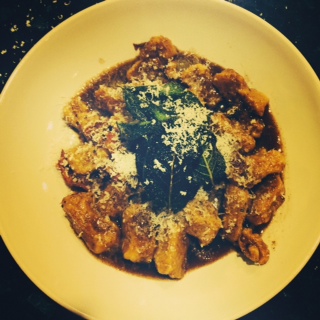
Voilà!

Voilà!

//